Sonitus 1581 Assembly Guide Part 1 - preparation | ||||
ASSEMBLY INSTRUCTIONS FOR SONITUS 1581 DIY FLATPACK SPEAKER KIT
Before starting work, please check you have all the correct parts for this project:
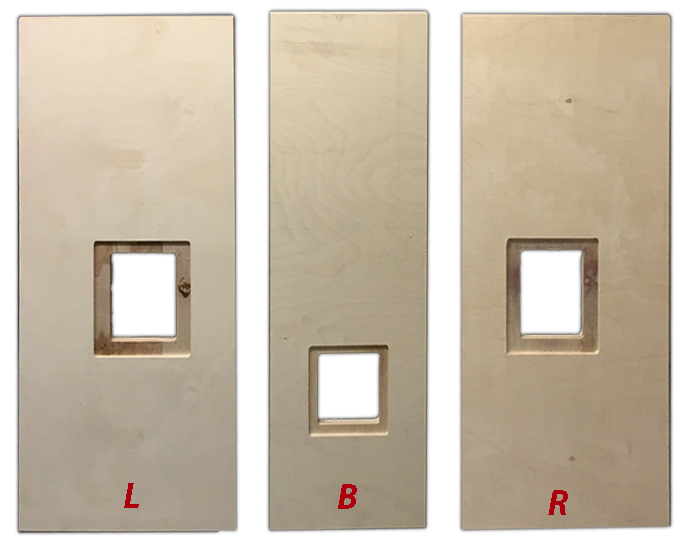
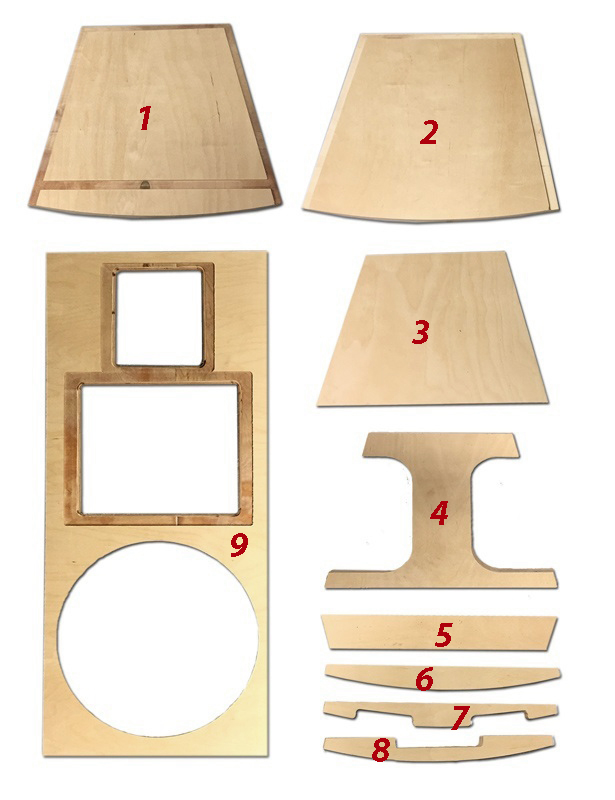
Parts List: 1. Top panel 2. Bottom Panel 3. Internal Divider 4. Internal Brace 5. Reflex Port 6. Grill Support 7. Grill support (mk2 version parts 5 and 7 are one piece) 8. Middle Grill Support 9. Front baffle L. Left Hand Panel B. Back Panel R. Right Hand Panel This is a DIY Flatpack project, all the parts are pre-cut which saves a lot of time and effort - however you will still need reasonable wood-working skills in order to complete this project. We have suggested recommended tools which are appropriate for use for this project. Ensure you use appropriate personal protective equipment at all times, and check all your tools are safe before proceeding. It is your responsibility to ensure you use these tools in a safe manner, if you are not confident in using these tools, please consult a professional for training and/or advice. Recommended tools: Air compressor with Nail Gun. This enables very rapid assembly - if you dont have access to one of these, you will need appropriate drills, drill bits, screwdrivers and screws. The packs are not pre-drilled, you will have to select appropriate screws and relevant bits as appropriate. Belt Sander. All the parts are cut to size, but a little fine tuning may be required and a belt sander is the ideal tool. It is possible to assemble without a belt sander, but you will most likely need some form of sander (fairly coarse) to adjust panels for a perfect fit. If you dont have a sander at all, the best solutiuon will be to ensure you have a plentiful supply of glue and use a generous amount on all joints to ensure any slight gaps are filled. Clamps. We use single handed quick clamps - these are very useful for hold parts in position while assembling. Any suitable clamp will do the job, but the single handed ones work great in this situation. You can still assemble without any clamps, but you will find some parts of the assembly quite challenging, and you may find it useful to have an extra person to help hold things.
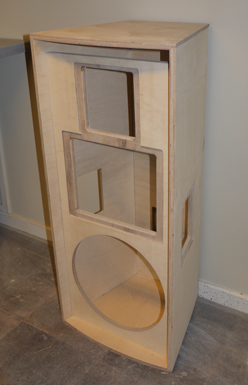
READY TO START? Take a couple of minutes to familiarise yourself with the parts, and dry-fit them in position without any glue, nails or screws - just check they fit together as expected (see picture). Each part needs to be positioned the correct way around in the correct place or your assembly will go wrong. In the image on the left we have just placed the panels in position, resting against the wall, to confirm it is a full set of parts. The connector panel cutout on the rear panel should be towards the bottom of the cabinet, and the handle cut outs on the left and right panels are slightly nearer the front of the cabinet and in the lower part of the cabinet roughly at the centre of balance. If you get the left and right panels the wrong way around the handles will be too high up. When you're familiar with the parts, move on to Part 2 of the instructions
| ||||